Step-by-step instructions for creating a homemade potato planter
Attached equipment allows you to significantly increase the scope of motoblocks and mini tractors. For example, a detachable potato planter makes planting a vegetable easier. There are various models on sale, but you can make it yourself. We will tell you how to make a potato planter with your own hands.
The content of the article
What is a potato planter
The potato planter is a special device used to plant potatoes accurately and quickly. This technique is very much in demand on farms.
Description and characteristics of the device
Different models may have additional mechanisms. But most units have similar designs:
- Furrow cutter. This is the part that creates the furrow for the potatoes. The keel option is usually used. While driving, this element pushes the soil apart.
- Rippers. These parts loosen the soil compacted by the tractor wheels or tracks. They are fixed opposite the wheels on steel posts - behind all the elements of the potato planter.
- Planting mechanism. Often, an elevator type is used, which consists of a transport element and gripper parts. The latter scoop the potatoes from the bottom of the hopper and move them into the seed tube of the opener.
There are also disc models, where tubers turners and shaking flaps are used to move potatoes. The turners are located at the bottom of the outlet hopper. They are made in the form of a rotating shaft with "cams" that lift the flaps and move the tubers.
The performance of a potato planter depends on the speed of movement. For tractor models, the operating speed is 4-10 km / h. In one hour, such units are capable of planting potatoes up to 1.3 hectares. Options designed for walk-behind tractors have a productivity of up to 0.2 hectares per hour of work, that is, a hundred square meters of area are processed in about 3-6 minutes. A manual landing will not do this.
What is it for
Thanks to the potato planter, work is accelerated many times over. Row spacing and planting depth are automatically maintained. But such units are used only on pre-prepared soil.
Reference. In addition to planting potatoes, the device is capable of performing other operations, for example, applying mineral fertilizers and dressing tubers.
Application features and benefits
The homemade potato planter has the following advantages:
- Landing becomes easier, easier and faster despite soil structure.
- The disembarkation is made at the same depth.
- The tubers are evenly distributed in the row.
- The device has high performance at low cost.
- If you use high-quality materials for the manufacture of the unit, it will last for many years.
The planting speed is not affected by the potato variety. Thanks to the device, the yield increases, as it plants the tubers evenly and at the same distance.
Read also:
Top leading countries in potato harvest worldwide.
The benefits and harms of potato broth.
Preparing the soil for planting potatoes: what acidity of the earth is needed.
Types and types of potato planters
Potato planters differ in the size and type of tuber feeding.
To size
Small-sized ones are used for planting potatoes in a summer cottage or garden plot. The design provides for a regulator of the depth and height of the earthen ridge, which is formed when the soil is raised. Small devices are suitable for motoblocks... The bunker volume of such potato planters does not exceed 35 liters. The planting rate is 0.1-0.2 ha per hour.
For medium-sized potato planters, the bunker volume reaches 45 liters, and the productivity is 0.25 hectares per hour. Such planters are installed on heavy walk-behind tractors and mini tractors.
Large ones are used for planting in large areas. Their bunker, respectively, is oversized and loaded using a dump truck.
By the type of seed supply
In the unit with a spoon system, potatoes are fed for planting using a structure of spoons attached to a belt.
The flat belt system consists of horizontally positioned belts between two main belts. Such a device produces a single-row fit.
The multi-belt system allows you to plant potatoes in two rows. Each row is served by several belts - up to 28 pcs.
Reference. When deciding which potato planter is better - belt or chain - it should be borne in mind that the second, due to vibrations during operation, the potatoes fall from the plate back into the bunker, and the planting is uneven.
How to make your own potato planter
Many vegetable growers and farmers prefer not to spend money, but to make potato planters with their own hands.
Required materials and tools
For manufacturing you will need:
- Corners and metal pipes from which the frame will be created. They are also needed for the installation of other structural elements.
- Gears are the elements that ensure the operation of the landing mechanism.
- Bunker for storing potatoes. Take a finished container or make it from sheet steel.
- Parts for making holes and burying them after planting.
- Wheelbase.
The listed elements are mandatory for a home potato planter. They are made independently or removed from old agricultural equipment.
For work you will need:
- Bulgarian;
- welding machine;
- spars;
- channels;
- a pair of axles;
- bearings;
- chain from the car engine;
- two chain sprockets;
- wire with a cross section of 6 mm;
- sheet metal 2 mm thick;
- shaped steel pipe;
- any cone-shaped container for the hopper.
Drawings, dimensions and basic elements
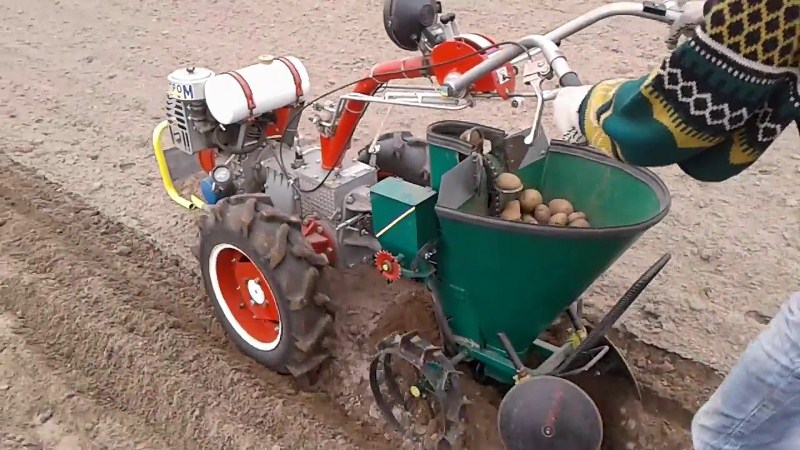
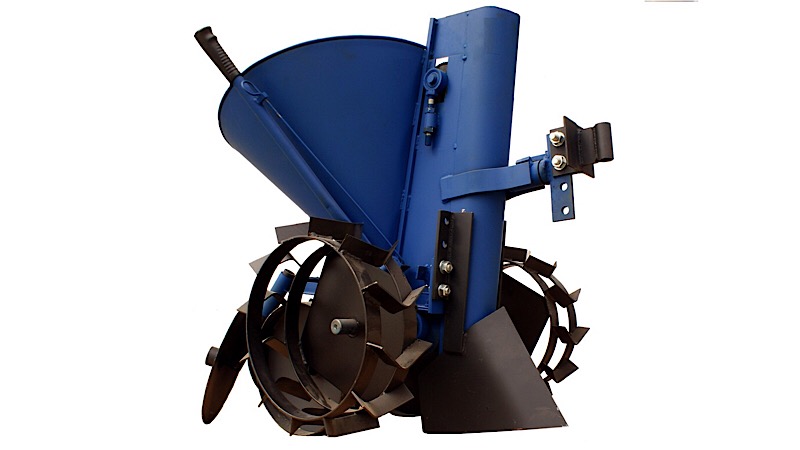
Outwardly, a homemade potato planter looks like a cart on wheels attached to a walk-behind tractor or mini tractor. Let's consider what the simplest design consists of.
The "cart" is placed on a frame made of channels. A steel arch and a fork are mounted to its front. On the sides of the frame, the posts of the sealing discs and the supports of the tuber supply system are installed.
Important! Covering discs are an important element. Thanks to them, the furrows are even, and the potatoes do not deepen more than necessary.
The frame, in turn, is installed on an axle with two wheels at least 15 mm wide, equipped with lugs. Simple rubber wheels will not work as they will slip.
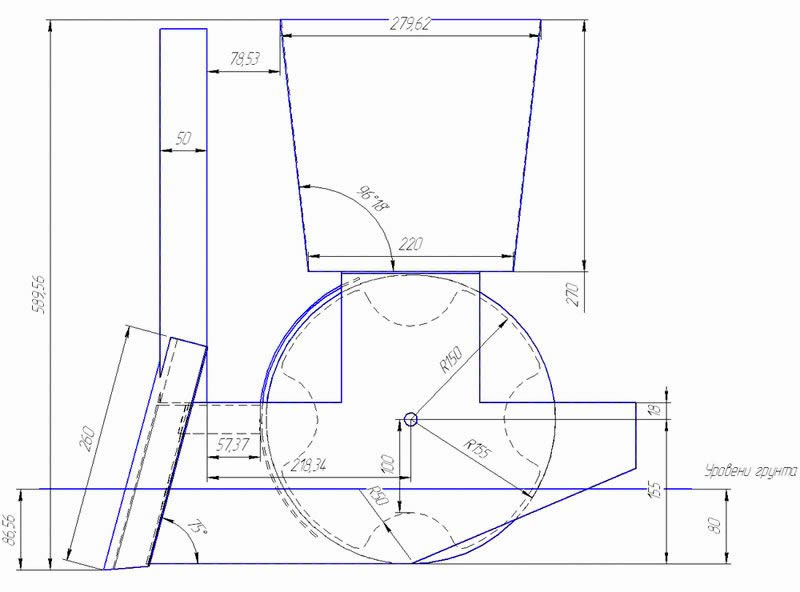
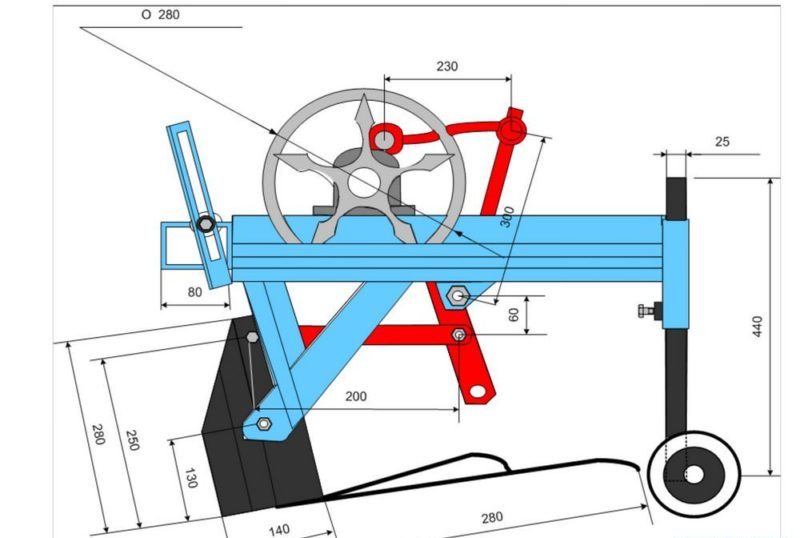
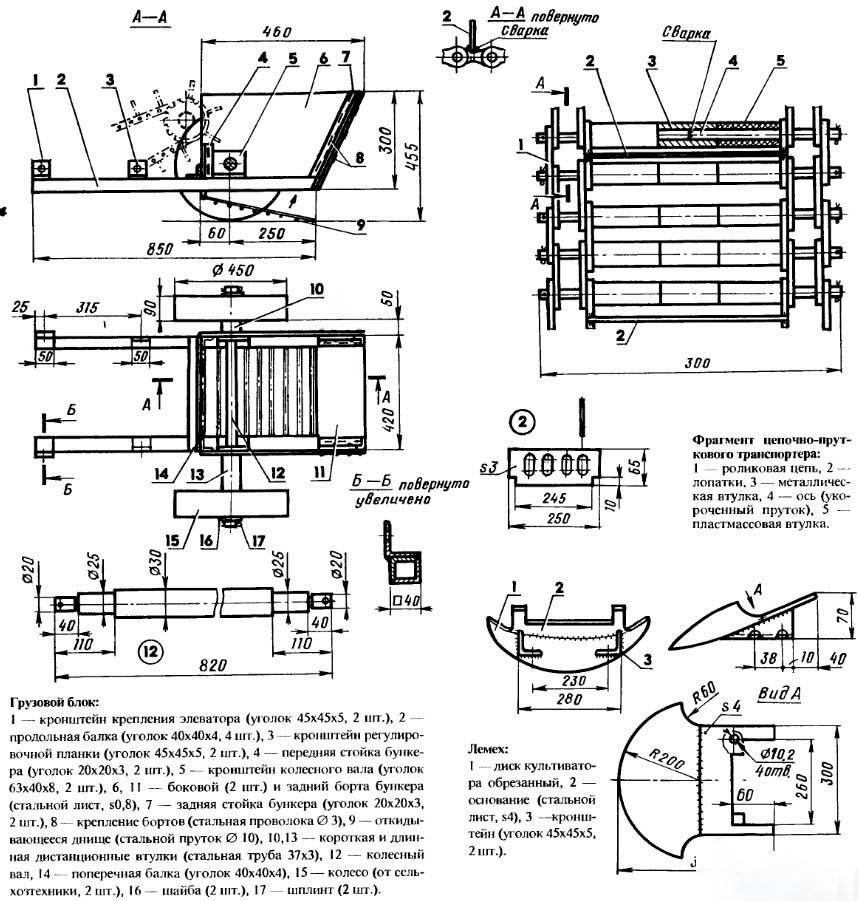
According to ready-made drawings with dimensions, you can make a cool potato planter with your own hands practically from scrap metal (see photos 1, 2, 3, 4).
Step-by-step instruction
Many craftsmen supplement the “basic assembly” with, for example, a fertilizer meter. Such a device allows feeding at the same time as planting.
Let's take a closer look at the process of assembling a planter for a walk-behind tractor and a mini-tractor.
For walk-behind tractor
First, the frame is made. To do this, use a channel (steel size 8). Longitudinal spars with three cross members are attached to the frame.
For the bunker, sheet steel is usually taken, but 10 mm plywood is also suitable for small equipment. This will be enough for 20 kg of potatoes.
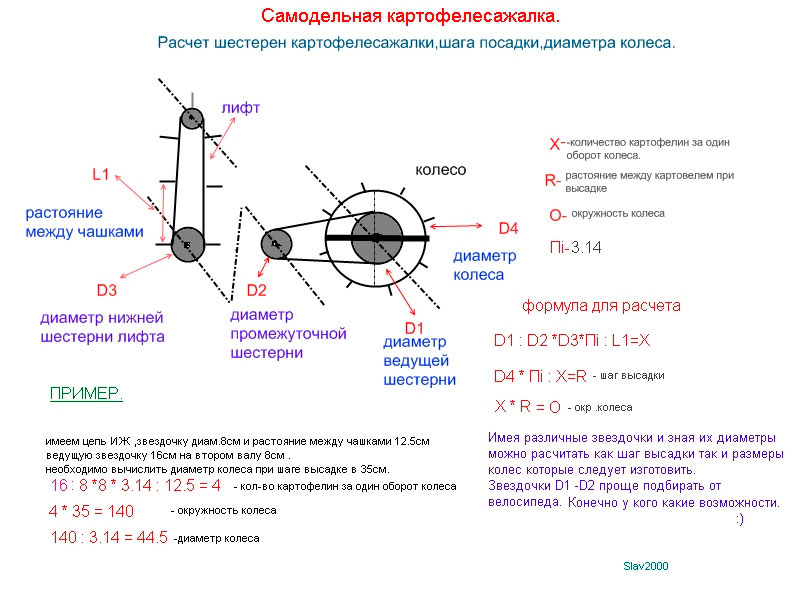
An elevator is installed in the bunker, which is fixed in a vertical position.Bowls with a diameter of 5-8 cm are placed on it. For everything to work, the mechanism is connected through a chain transmission to the drive wheel. To remove tubers, the seed tube is fixed under the elevator.
An asterisk (8 cm) for the transmission of force is tied along a chain with a walk-behind tractor. This element transfers motion to the burrowing discs.
This design allows you to use a regular bicycle chain. The distance between the tubers will be 35 cm.
Important! After the main installation, the frame must be reinforced with steel strips. The arch also needs reinforcement. To do this, use sheet steel plates.
For mini tractor
A diagram of such a unit is shown in the photo:
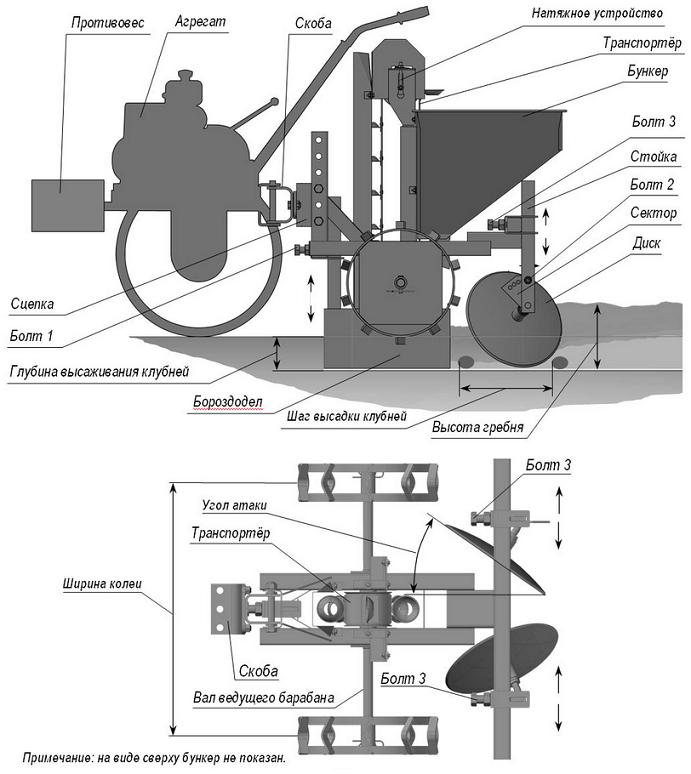
Algorithm of actions:
- Manufacturing begins with a frame on which the rest of the elements will be placed. To do this, longitudinal spars are welded from the channels. They are interconnected with steel strips.
- An arch with forks directed towards the central link is welded in front.
- The frame is reinforced with steel beams. They are fixed on the other side and to the middle of the arch.
- The seatpost support is made from the corner and mounted on the spar.
- A bracket is welded to the inclined beams, on which the bunker will be placed.
- The potato tank is welded from 2 mm thick sheet steel.
- The hopper is bolted to the bracket.
- Now the ripper and wheel axle are mounted to the bottom of the frame. For the axis, an ordinary steel pipe is taken as a basis, at the ends of which pins are placed. For the wheelbase, you can take wheels from old technology.
- Ripper holders are made in squares made from rods. At the ends, clips with a steel thickness of 6 mm are welded. Cultivator stands will be located in them.
- The sower is made from a steel pipe with a cross section of 100 mm. The minimum wall thickness should be 3 mm.
- A furrow cutter is welded to the bottom of this pipe. Steel thickness - at least 6 mm.
Tips & Tricks
The planting process using such a device is as follows:
- Another 2-3 bags of potatoes are placed on top of the filled tank to save time when the hopper is empty.
- One person should be on the potato planter, and the second on a walk-behind tractor or mini-tractor.
- Do not exceed the driving speed of 1 km / h.
- It is desirable that the design of the device be provided with disks burying the holes.
- To change the planting depth, adjust the ladders or change the angle of the discs.
Conclusion
Making a potato planter yourself is a difficult but feasible process. If you prepare the drawings in advance and follow the instructions, everything will work out for any home master. Even a small device like this will save a lot of time and effort.