How to make a potato hiller for a walk-behind tractor with your own hands
Hilling crops preserves soil fertility, increases cultivation efficiency, and reduces fertilizer and irrigation costs. It is impossible to harvest a rich harvest of some vegetable plants, especially potatoes, without this procedure. But spilling by hand is long and tedious. It is faster and more economical to use a walk-behind tractor with a hiller. You can make such a device yourself. Consider what kind of potato hillers are for a walk-behind tractor and how to make them yourself.
The content of the article
What is a hiller for a walk-behind tractor: description and characteristics of the device
A hiller is a mechanism by which the soil of various lengths and complexity is plowed and cultivated.
The nozzle is used to cultivate crops, loosen, dig up the soil, and fight weeds. The device is made of metal, has blades or is equipped with rotating discs that are attached to the frame.
Install the attachment on the walk-behind tractor using special fasteners. Attachments provides different hilling heights and depth of penetration into the ground. Together with loosening, the device lifts the soil to the required level and aeration. Deboning width, height, and tilt angle vary by model.
What are the types of hillers
Depending on the design features of the nozzle for hilling are subdivided into several types.
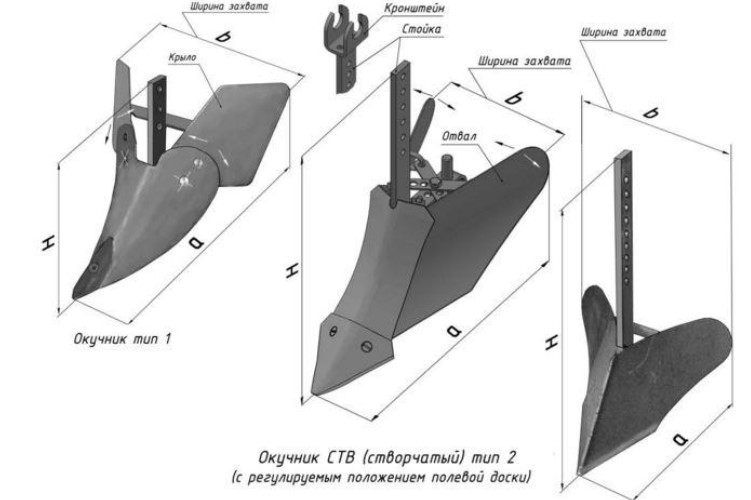
Lister
Outwardly it resembles the wings of a butterfly. Differs in a fixed working width. Due to the sharp ends, it descends to the set depth.
Mechanism advantages:
- simplicity of design;
- low power consumption;
- light weight - does not require powerful units;
- the price is lower compared to other types of hillers.
Plant potatoes it is important exactly, strictly observing the same row spacing. The device does not do well on wet and heavy ground.
Doubled

This is a two-row or swing mechanism for cutting flat parallel furrows in large areas and hilling them. The height of the ridge varies from 10 to 20 cm and is limited by the lifting of the gearbox relative to the soil level.
Unit advantages:
- universality of application;
- ease of building even furrows over large areas;
- adjustable distance between plowshares;
- the ability to make ridges simultaneously from both sides of the planting.
The nozzle requires regular cleaning and anti-corrosion treatment. The device is designed for light, pre-prepared soils.
Dutch
The design of the potato tiller allows the blades to rotate horizontally and vertically. The lower edge of the wings resembles a ridge.
Mechanism advantages:
- improving the quality of work;
- the use of low-power motoblocks;
- profitability (the device has a low price).
The attachment works in tandem with car weighing from 30 kg, recommended for use on all types of soil.
Plow-shaped
This is a streamlined mechanism. Its advantages:
- low intensity of soil eversion;
- preservation of moisture in the ground due to less aeration;
- ease of tilt angle adjustment;
- processing a large area.
By using this model, farmers reduce the time and effort involved in cultivating.The plow-shaped nozzle is best used with a powerful walk-behind tractor.
Disk
The working elements of the hiller are circles that penetrate the soil to the adjusted depth.
The mechanism is popular for the following reasons:
- high reliability and durability;
- ease of use;
- compatibility with all types of cultivators and increasing their power;
- ease of rolling root crops.
Basically, the nozzle is used for processing potato plantings.
Information! The corners of the discs must clearly correspond to each other, otherwise the unit will move away from the desired direction.
Propeller
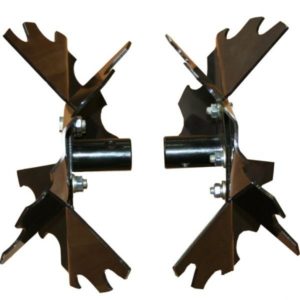
Mechanisms of this type are also called active, or rotary, they are similar to fan blades. The principle of operation involves 2 rotational forces and a translational movement.
The positive aspects of the unit:
- the nozzle not only spuds the plants, but also throws the earth from place to place;
- the device effectively fights weeds;
- the beds are collapsed with loosened soil - the growth of plantings is improved.
The model is not compatible with all types of cultivators. They use the propeller attachment only on walk-behind tractors with two forward gears.
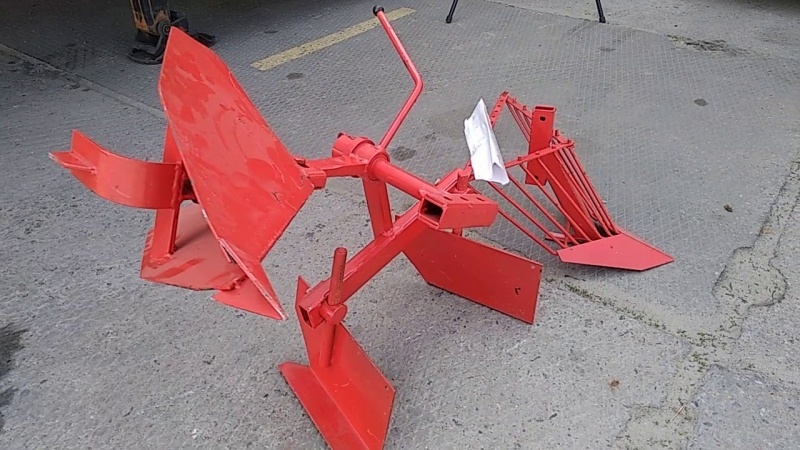
How to make a do-it-yourself potato hiller
It is important to follow the rules and strictly follow the installation instructions. Drawings and dimensions must be accurate.
To make a nozzle yourself, you will need:
- choose a suitable drawing;
- choose equipment;
- examine the sequence of actions.
It is strictly necessary to observe the dimensions and symmetry, otherwise deviations from the norm will affect the operation of the unit.
Tools and materials
Before starting work, prepare inventory and necessary materials:
- arc welding machine;
- bolts, fasteners;
- grinder with discs and attachments;
- files of different sizes;
- electric drills with drills;
- Workbench;
- mains-powered emery;
- gas burner.
Strong metal is required to create the packing, high alloy steel is preferred. The material is resistant to mechanical stress and rust.
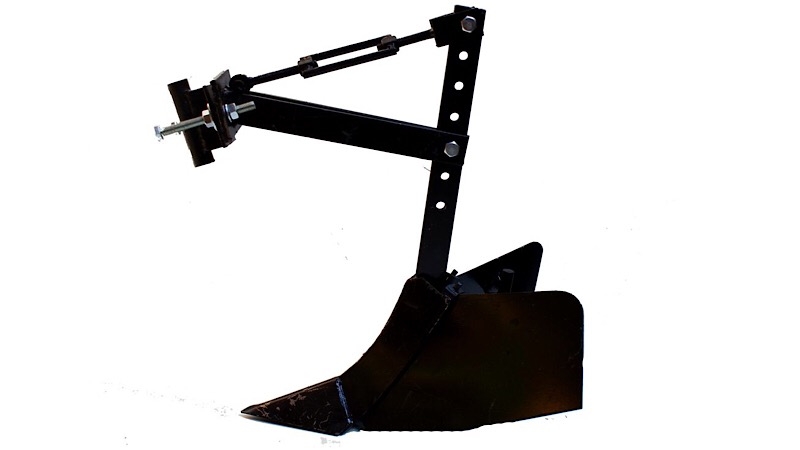
We construct a lister hiller
It is not difficult to make a mechanism. Step-by-step instruction:
- Take a strong metal sheet with a thickness of 3 mm. Cut a blank out of it, according to the drawing.
- Sharpen on the side where the bottom edge will be.
- Bend in the middle through the fixed pipe. Punch the leading edge with a hammer.
- Spread the wings of the nozzle.
- Fix the distance between the blades with the cross member by welding it behind the planes.
- Punch the bottom of the part so that the blades are plow-like.
- On the front part of the hiller, fix the stand with holes by welding.
- Bolt the bar going to the walk-behind tractor to the stand.
If an adjustable attachment is required, the wings are secured with hinges and a bar.
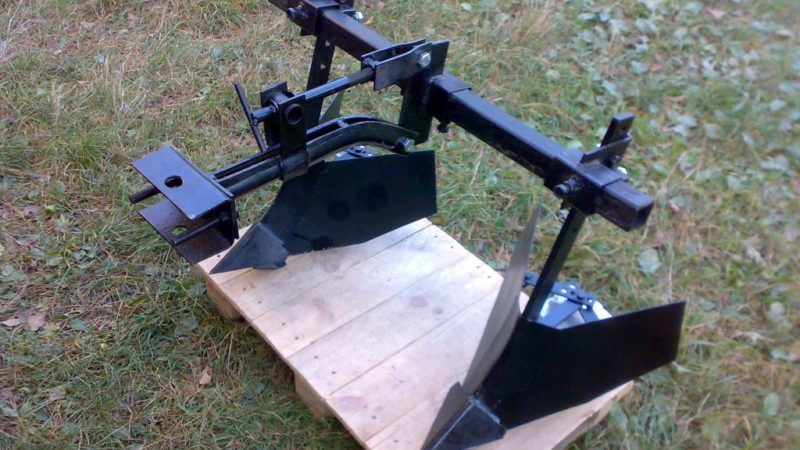
Doubled
Instructions for creating a structure:
- Punch out or saw out a strip of iron sheet 2 mm thick.
- Form rectangular slits on each side.
- Bend the belt in the middle so that it goes around the square bar at the rear at a 90 ° slope, forming the front double eyelet.
- Pass the hinge rack into it.
- Drill a hole in the bracket for the bolt.
- Make holes on the left and right sides of the rod cavity with the same distance between them.
- Carve by hand. Use a tap and knob.
- At the rear of the fastening, through the thread in the rod, tighten the bolt until it stops.
- In the middle part of the crossbar, weld the stand to ensure reliable coupling of the nozzle with the walk-behind tractor.
By moving the structure along the rod, the width of the rows is adjusted and double twisting is carried out. The dump mode is set by spreading the wings. For the correct operation of the mechanism, special attention is paid to the quality of fastening the rack in the eyelet.
Plow-shaped
Phased creation of the mechanism:
- Make a frame. Take an iron pipe measuring 52x40 mm with a wall thickness of about 7 mm. Cut off opposite partitions, make a fork.
- Mark the middle on the frame.Weld the hole in the front of the frame structure.
- Secure the plow rack. In a wide piece of pipe, drill through holes with an area of 3.1x1.6 cm for the bearing part.Make no more than 1.02 cm of the holes in the narrow walls of the bed.
- Make a handle out of a half-inch pipe.
- Design a hitch. Use U-shaped channel mount and install under the steering head.
- For the main working parts, take a metal sheet up to 5 mm thick. First make a ploughshare. An old circular saw blade is suitable for this. Use an anvil for sharpening.
- Create a dump from a pipe 0.6 m long.To do this, take cardboard or paper as a template, attach to the pipe, circle. Cut with a welding machine. Process with emery or grinder.
- Collect the plow. Weld the parts to a 0.25 m² steel sheet. Use a hammer or chisel to disconnect the base on which the preparatory work was carried out.
- Sand the seams, sand the blade and share.
Paint the finished structure.
Important! Compliance with dimensional accuracy is mandatory.
Dutch
To make a nozzle, follow the sequence of actions:
- Cut the wings out of a 3 mm iron sheet.
- Sharpen the edge under the bottom edge.
- Bend in the middle.
- Knock off the leading edge with a hammer.
- Spread the blades of the nozzle.
- Weld the crossmember behind the wings, adjusting the distance between them.
- Punch through the bottom of the part and make it look like a share.
- Fix the stand with holes by welding on the front of the hiller.
- Bolt the bar that goes to the walk-behind tractor to the rack.
- Adjust the attachment by attaching the wings to the hinges to the boom.
The device is ready for use.
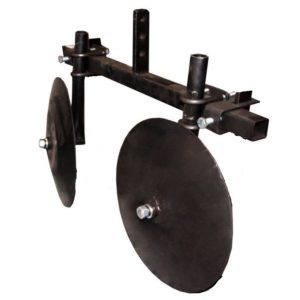
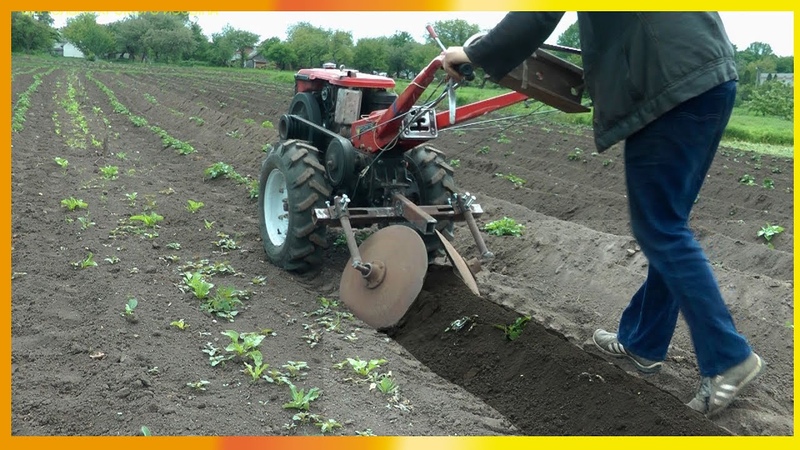
Disk manual hiller for potatoes
The mechanism consists of 2 circles with a hub, a crossbeam, a handle and struts. Phased production:
- Take a steel sheet 3 mm thick. Alternatively, use 50-60 cm pot lids or discs from an old drill.
- Cut out circles with a diameter of 45-50 cm.
- Sharpen the edges at an angle of 45 ° with a machine or grinder.
- Weld the hubs in the center.
- Make the mounting brackets from pipes measuring 32x45 and 45x55 mm. In the middle of the longer branch pipe, weld the smaller one. Drill a 12 mm hole in a pipe with a diameter of 45 mm. Weld on the nut so that the bolt is completely screwed in.
- Make a rack. Bend 2 lintels from pipes 32x250 mm at an inclination of 30 °. Fit bushings 45x55 mm by butt welding from one edge, from the opposite - perpendicular to the end. Make holes with a drill and weld nuts to them.
- Assemble the handle from thin pipes and a sleeve 45x120 mm, in which to make holes of 12 mm.
- Perform general assembly. Paint metal surfaces. Insert the crossbeam into the bushing of the handle, secure with the locking bolts. Fasten the disc hubs to the struts. Screw in the crossbars so that they fit into the holes in the bushing. Put the rods with discs on the cross beam. Screw on.
- If desired, the attachment of the circles is made adjustable.
In order for the device to function, dents are removed from the surface of the discs. The curvature must be strictly symmetrical, otherwise the nozzle will not work.
Propeller
A homemade ridge former is used not only to store soil for potatoes, but also for planting vegetables.
Instructions:
- Prepare a metal sheet with a thickness of 2 mm.
- Cut 3 stripes below the axle.
- Make 3 holes at equal distance from each other.
- Run the rack and base. Arc welding.
- Fix one strip in the middle of the base, the other two on the sides. Fit them to the walk-behind tractor.
- Choose the distance between the elements, the shape of the lugs, the angle of the unit.
- Design multiple bushings with brackets, different sets of blades.
- Attach the hiller to the walk-behind tractor, adjusting the angle of attack and the depth of penetration into the ground.
The unit is ready for use.
Operating tips
Even if the stages of making a hiller were followed and everything was done correctly, it is important to learn how to use it, correctly configure and sharpen the parts. After assembly, the unit is tested on site. The quality of work will depend on the condition of the soil, climate and weather on the day of plowing.
Adjust the mechanism as follows:
- They pass the nozzle along the ground, set the angle of inclination of the elements and the immersion depth. It should not exceed the total length of the product.
- The device should not scatter the soil on the sides, worsen the appearance of the furrow.
Do not use the equipment if there are animals and children nearby. The machine must not be used if it is out of order or left unattended.
Conclusion
It is not difficult to make a hiller for a walk-behind tractor with your own hands. It is important to use it wisely. Lister and twin types are suitable for processing light soil. If the walk-behind tractor is low-power, it is better to use a Dutch or propeller mechanism. On dense, clayey soils, there will be more crush from the disc. If you follow all the recommendations for operation, the unit will last a long time.