A bright variety with a rich harvest and rich taste - the Eldorado tomato and the peculiarities of its cultivation
We all actively use different varieties of tomatoes in cooking: from plum tomatoes to small cherry tomatoes. But have you heard of the Eldorado tomato? You can find detailed information about these tomatoes, which are so popular among farmers, characteristics, photos and description of the variety below.
The content of the article
Description
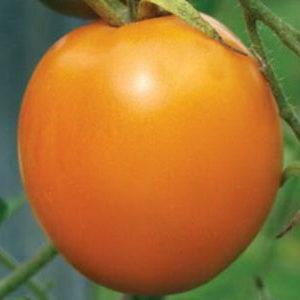
Eldorado are hybrid tomatoes, usually pear-shaped with firm flesh, containing a small amount of juice. There are two varieties: gold and crimson.
Tomato bushes bear fruit all season before the onset of cold weather and grow over 2 m. Monochrome fruits usually reach 7-8 cm in length and can weigh up to 600 g. The yield is 9 kg of fruits per 1 square meter.
It can be assumed that the name Eldorado is directly related to the color of this tomato variety and refers to the legendary lost golden city. Like the tomatoes themselves, the El Dorado myth has its origins in South America.
Tomatoes are known for their rich content of antioxidants, especially lycopene, the properties of which are actively studied by oncologists. The fruits also contain a large amount of vitamins A, B, C, K, potassium and calcium, which helps to maintain good condition of vision, skin, nails and teeth, bone tissue and heart.
Ideal for both fresh use and drying and preserving.
On a note. Due to the extraordinary color of the fruits, the Eldorado tomatoes will be an interesting addition to colored pastes or sauces.
Growing seedlings
Consider the main stages of growing seedlings.
Seed preparation
Thorough preparation of seeds for seedlings is the key to a good harvest. The preparatory stage includes the following procedures.
Culling (sorting)
Immerse the seeds in a solution of table salt (1 tsp for 1 glass of water), leave for 10 minutes. Remove floating small empty seeds, use those that remain at the bottom for germination. Rinse them with water, dry. These large seeds contain more nutrients.
Note! Sometimes, after sorting, the seeds are warmed up, but this does not need to be done with the seeds of hybrid tomatoes.
Disinfection
The easiest way is to keep the seeds in full sun for 5-7 days. If the sun is not a frequent visitor in your area, process tomato seeds with a 1% solution of potassium permanganate for 30-40 minutes at room temperature. Then rinse with water.
Nutrient treatment
If you wish, you can soak the seeds in one of the nutrient solutions of both chemical (Immunocytophyte, Epin) and natural (aloe juice). There is no need to rinse the seeds.
Soaking
Place the seeds in a cheesecloth bag and immerse them in warm water for at least 12 hours. The amount of water should be 20-25% less than the amount of seeds. It is necessary to change the water every 4-5 hours, pulling out the bag of seeds in order to saturate them with oxygen.
Germination
Place the seeds in a saucer lined with gauze or filter paper. Keep the temperature at 20-25 degrees, keep an eye on the condition of the gauze / paper (it should not be dry and excessively damp).
Hardening
Place the seeds that have hatched overnight in the refrigerator (0-2 degrees), then keep them at a temperature of 15-20 degrees during the day. This hardening will prepare the seeds for changing weather conditions.
The above procedures are carried out at will, they accelerate the emergence of seedlings, reduce the incidence of plants and increase the yield.
The seeds can also be sown outdoors after the danger of frost has passed, in the spring and in warm ground.
Soil preparation and container selection
It is recommended to use store-bought soil for germination - it contains the nutrients necessary for growth. However, if you want to prepare the soil yourself, the following recommendations will help you.
Take garden or vegetable soil as a basis, add peat and humus in equal quantities. If necessary, loosen the soil yourself by diluting it with river sand and sawdust. To make the soil more fertile, add mineral fertilizers (sulfate, urea).
After the seeds sprout on the saucer and have 5-6 strong leaves, plant them in common containers or in separate cups. Fill such containers with prepared soil, the layer of which should not exceed 5.5 cm, then moisten it and tamp it.
Sowing
Let's move on to the next step. When all containers are ready, dig holes 5 to 7 mm deep. Then pour warm water and nutrient solution over each well. Dip the sprouted seeds into each of them, sprinkle with soil and moisten.
Growing and care
For further successful germination, cover the containers with plastic wrap and place in a warm room. The seeds must be kept in constant moisture, so remove the film gradually. Open it a little every day so that the seeds get used to the fresh air. After 1-2 weeks, the film can be removed.
Seeds need a lot of sunlight. Since seedlings are grown for 2-3 months before transplanting into open ground, the winter sun is not enough for good growth. Use additional lighting with fluorescent lamps every day for 16 hours. If this is not possible, place the containers on the lightest windowsill.
Concerning glaze - look at the condition of the soil. Maintain it in a damp state, not allowing the top layer to dry out. Water gently under the stem without touching the sprouts. After removing the film, you can increase the number of waterings. The main thing is not to overdo it. Flooded soil, as well as dry soil, can cause seedlings to wilt. It is better to water in the morning, as the sprouts can freeze at night due to a decrease in temperature.
Read also:
Rating of the 15 best varieties of low-growing tomatoes for greenhouses.
We choose the best variety of ultra-early ripening tomatoes and get a rich harvest.
What low-growing varieties of tomatoes are the most productive.
How to grow tomatoes
There are some features of growing Eldorado tomatoes. It is recommended to plant seedlings in the ground when the air temperature reaches 20-25 degrees (April, May). You can plant it in the greenhouse much earlier, but you need to monitor the weather conditions - the onset of frost will negatively affect the seedlings.
The soil should be rich in nutrients, fertile, deep, moist, well-drained.
On a note. To prevent tomato disease, such as black leg disease, treat the soil with a manganese solution.
Domestic farmers recommend placing seedlings at a depth of 0.5 cm at a distance of about 30-60 cm from each other, if space is limited. If not, a distance between the seedlings of 120-150 cm is allowed. In the greenhouse, the sprouts are planted at the rate of 3-4 bushes per square meter.
Take responsibility for watering the Eldorado tomato bushes. Do not allow the soil to dry out, otherwise the seedlings may die. When watering, remember to loosen and weed the soil for better moisture absorption.Fertilize the soil every 2 weeks during the entire process of seedling growth and fruit ripening.
After the bush is formed, it is tied up. To do this, manually remove the bottom stepsons and leaves. It is better to perform this procedure in the morning on a sunny day.
Important! Break off the stepsons and leaves gradually (2 stepsons and leaves) to prevent the death of the bush. Make sure that the leaves of the bush are not lying on the ground. This way you can prevent them from getting infected.
Despite the fact that tomatoes are considered one of the easiest and most popular vegetables to grow in a garden or vegetable garden, both beginners and experienced gardeners are faced with the problems of plant diseases and pests.
Tomatoes are susceptible to a wide variety of diseases. The most common ones are:
- Root rot, or black leg - blackening in the area of the root collar and root.
- Alternaria - brown spots on leaves, fruits and stems.
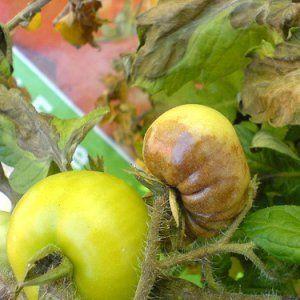
- Bacterial cocker. Leaves wilt, turn yellow, then brown and die from the bottom up.
- Septoria - small brown spots with yellow rings on fruits and leaves. Older leaves are most often affected.
- Powdery mildew. White bloom (mycelium) on the leaf surface. It is spotted and starts from the lowest leaves.
- Bacterial mottling. Oily brown spots appear on the leaves, after which the affected areas of the plant wither.
- Bacterial cancer. The leaves fade from the bottom up, brown growths form on the petioles. The fruits deteriorate both inside and outside (white spots appear on the skin).
- Bacterial wilting. There are no visible symptoms, tomatoes quickly wilt and die. The disease is quarantine, and therefore is considered the most dangerous. To prevent infection already at the planting stage, be sure to quarantine greenhouses.
As for pests that can damage or destroy tomato plants, there are many of them too. As a rule, tomato pests attack fruits or leaves.
First, we list the insects that settle on the leaves of plants. These are aphids, blister beetles, cabbage loopers, Colorado potato beetles, flea beetles, smelly bugs, thrips, tomato hornworms, and white flies.
Now let's look at pests that attack exclusively fruits. These are rodents, slugs, tobacco stews, tomato fruit worms, tomato pinworms and vegetable leafy milk jugs.
The main thing is to timely detect deviations in the process of growing Eldorado tomatoes. A quick response to diseases or pests will help correct the situation and avoid crop loss. Remember, tomato growth problems are actually common. Even gardeners with years of experience can find that their tomatoes have killed off diseases or pests.
The nuances of growing in open ground and in a greenhouse
Growing tomatoes in a greenhouse is significantly different from planting in an open field. A greenhouse, usually made of polycarbonate, should be warm and airtight. As mentioned earlier, before planting seedlings, it must be disinfected, and the soil must be watered abundantly with water and, if desired, fertilized with nutrients.
Important! Before planting seedlings, the greenhouse is ventilated for 5 days.
The ground flooring is within 25 cm, otherwise the earth simply will not warm up. Plant 10 cm from the sides, using the planting scheme in the form of the letter P or W. Direct the legs of the "letters" to the exit from the greenhouse. Arrange the holes in a checkerboard pattern. We have already talked about the depth of the holes.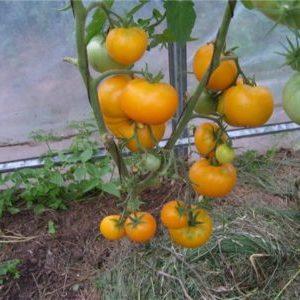
Water the soil at least one week after planting.
There are several factors to consider when growing tomatoes outdoors. The place should be sunny and warm, protected from strong winds. Farmers do not recommend using soil after growing potatoes, peppers, eggplant and physalis.
Dig up the selected area of soil and feed with fertilizers.
Form the beds in the direction from east to west.This will allow the soil to warm up faster. Recommended width - 1 m, height - 20-25 cm. Loosen and level the soil. Now you can proceed to creating holes. Usually they are placed in 2 rows at a distance of 60-70 cm.
On a note. Staggering the holes gives them the best possible sunlight.
Plant the seedlings outdoors in the afternoon when the heat subsides. Before planting, water the plants, put humus, fertilizer in the holes and pour water also abundantly. After planting, water the plants again and cover with paper caps or any other non-woven material.
Cover the soil with humus, peat, compost or sawdust immediately after planting. This will reduce moisture evaporation. Loosen the soil regularly. The first time is 2 weeks after disembarkation. After 1.5 months, huddle the tomatoes to avoid stem breakage.
If it gets colder, cover the seedlings with plastic wrap to avoid killing the crop.
Water the tomatoes outdoors at least 2-3 weeks after planting. Then 1-2 times every 10 days, spending 3-4 liters per plant. Use water heated in the sun for irrigation.
Harvesting and application of the crop
Harvested 110-125 days after sowing the seeds. About 9 kg of yellow or raspberry fruits are removed from a square meter. The harvested crop is good both for fresh consumption and for canning.
Tomatoes with a rich color will serve as an excellent addition to vegetable salad or vegetable paste. It all depends on your imagination and preferences.
Advantages and disadvantages of the Eldorado variety
One of the obvious advantages of this tomato variety is its appearance. The beautiful shape and interesting color are striking.
In addition, Eldorado tomatoes are resistant to wilting, taste good when fresh. By planting tomatoes of this variety, you are guaranteed to ensure yourself a rich harvest.
It is difficult to name any disadvantages of Eldorado, except for the low juice content in the fruits. However, this fact can also be an advantage - the high density of tomatoes will save time for preparing sauces and vegetable pastes.
Council. Try adding fresh salsa to the Eldorado sauce. Serve with fresh aromatic herbs and soft young cheeses.
Farmers reviews
Galina: “The Eldorado variety was recommended by friends, the same summer residents. The choice fell on a variety of yellow tomatoes. I didn't have to bother much, I grew it in a greenhouse, and in the end I got pretty low bushes and a rich harvest. And with our climate, every tomato is worth its weight in gold! The fruits themselves are quite large, the largest is 400 g, very tasty, they also fit perfectly for salting. Decent grade, I recommend. "
Irina: “I planted Eldorado out of curiosity - I liked the look. Tomatoes, of course, are delicious and look beautiful in a salad. The bushes are not tall, but they still had to tie up. There were no particular difficulties in growing. "
Conclusion
We hope that our article will help you grow this unusual tomato variety. Don't be afraid to try new things! We are sure that Eldorado tomatoes will delight you with their appearance and taste.